从零开始写文章
本文最后更新于:2024年7月12日 晚上
安装cnpm
安装node.js。
进入node.js安装目录,创建文件夹:
node_cache、node_global使用管理员权限打开控制台窗口
输入如下命令
1
2
npm config set prefix "选择刚刚创建node_global文件路径"
npm config set cache "选择刚刚创建node_cache文件路径"在环境变量
Path项加入node_global的路径,否则会报错:“cnpm不是内部或外部命令……”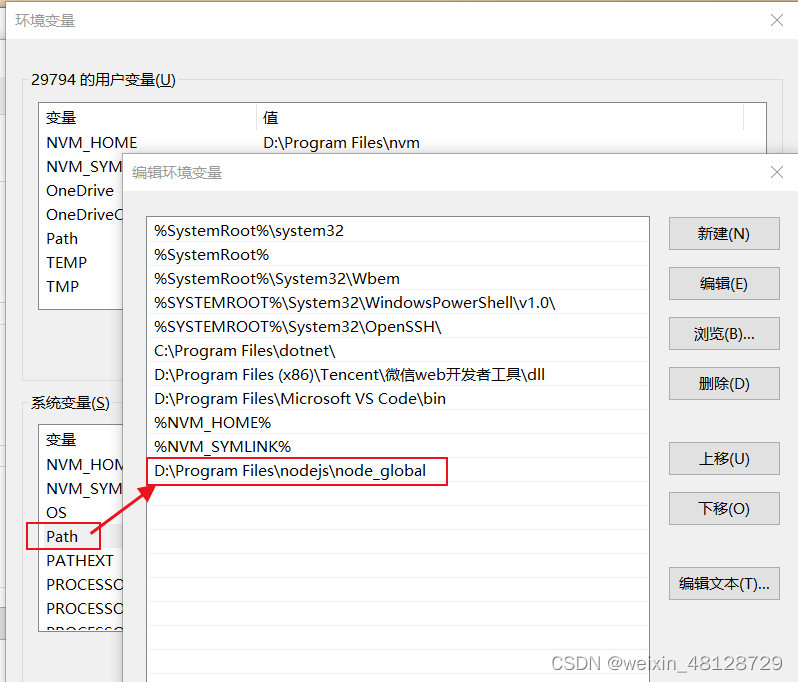
安装 cnpm
1
npm install cnpm -g如果没有管理员权限,安装会报错。
安装Hexo
1 | |
如果没有管理员权限,安装会报错。
Hexo初始化
1 | |
会自动创建名为博客名的文件夹作为博客目录。
安装主题
打开控制台窗口并进入博客目录
安装
hexo-theme-fluid 1.9.21
cnpm install --save hexo-theme-fluid@^1.9.2注意:
hexo-theme-fluid在1.9.4或更新的版本,由于使用Nunjucks做渲染,Hexo原生的skip_render将会失效,由于某些无需渲染的文件无法跳过渲染,渲染时就会报错。
更新主题
不建议更新到1.9.2之后的版本
1 | |
目录树
完成安装hexo-theme-fluid@^1.9.2后,目录树应是这样的:
1 | |
配置主题
修改 Hexo 博客目录中的
_config.yml:1
2
3
4
5
6
7
8
9title: 秋夜临的日记
description: '欢迎来到秋夜临的自留地' # 指定网站描述
author: 秋夜临
language: zh-CN # 指定语言,会影响主题显示的语言,按需修改
url: https://www.qiuyelin.com
permalink: :year/:month/:day/:hash/ # 参考 https://hexo.io/docs/permalinks#Variables
theme: fluid # 指定主题Variable Description :year发表年份(4 位数) :month发表月份(2 位数)(例:01) :i_month发表月份(去掉开头的零)(例:1) :day发表日期(2 位数) :i_day发表日期(去掉开头的零) :hour发表时间——时(2 位数) :minute发表时间——分(2 位数) :second发表时间——秒(2 位数) :title文件名(相对于“source/posts/”文件夹) :name文件名 :post_title文章标题,取决于文章的Front-matter的 title项:id文章 ID (清除缓存时不具有持久性) :category分类。如果文章没有分类,则是 default_category配置信息:hash文件名(与 :title相同) 和日期的SHA1哈希值(12位的十六进制数)在根目录下创建文件一个名为
_config.fluid.yml的文件将
./node_modules/hexo-theme-fluid/_config.yml的内容复制到新建的_config.fluid.yml文件中修改 Hexo 博客目录中的
_config.fluid.yml:1
2
3
4
5
6
7
8
9
10
11
12
13
14
15
16
17
18
19
20
21navbar:
blog_title: "秋夜临"
index:
slogan:
enable: true
text: "秋夜临的日记"
post:
mermaid:
enable: true
specific: true
footer:
beian:
enable: true
# ICP证号
icp_text: 琼ICP备2022005855号-1
# 公安备案号,不填则只显示ICP
police_text: 琼公网安备 46010802001035号
# 公安备案的编号,用于URL跳转查询
police_code: 46010802001035
# 公安备案的图片. 为空时不显示备案图片
police_icon: /img/police_beian.png配置首行缩进:
你需要修改CSS样式:
进入博客目录寻找如下的文件
/node_modules/hexo-theme-fluid/source/css/main.styl在文件中修改(若没有则加入)如下内容:
1
2
3
.post-content p {
text-indent: 2em;
}
编辑文章
官方文档:写作 | Hexo 、Hexo Fluid 用户手册 |文章页
在博客目录下打开命令行窗口,使用命令
1
hexo new "文章标题"创建文章,创建的文章在
./source/_posts/文章标题.md,这是一个文本文件,可以使用任何文本编辑器(比如记事本)打开。系统生成的文章,会有一个头(Front-matter),默认的头包含如下内容:
1
2
3
4
5
6
---
title: {{ title }}
date: {{ date }}
tags:
---可以自定义系统生成的文章头,只需修改文件
./scaffolds/post.md即可。可在头内添加如下内容:categories:文章分类,具体可以参考:分类和标签 - Front-matter | Hexo
1
2
3
4
5
---
categories:
- 分类名
- 二级分类名
---mermaid:是否启用渲染公式或流程图 (true / false)[1]
hide:是否使文章在首页不可见 (true / false)[2]
摘要:一般不超过150个字符,描述内容要和页面内容相关。
可在头内设置摘要:
①添加
excerpt字段[3]:1
2
3
4---
excerpt: 这是摘要
---②或者你也可以添加
description字段:1
2
3
4---
description: 这是摘要
---
文章正文内容与普通markdown文档无异,可使用在线markdown文档编辑器、VS Code等编辑,推荐使用Typora,因为它是所见即所得的。
好的文章往往站在前人的肩膀上,注明参考文献是对他人劳动成果的尊重与肯定。
Markdown以及Hexo均对参考文献有较好的支持[4]:
1
2
3
4
5正文
引用的一句话[1]
###参考文献
[^1]: 这句话的出处
安装hexo-generator-baidu-sitemap网站地图生成器
1 | |
一键部署
Hexo自带有服务器[5],可以在博客目录下打开命令行窗口,使用命令:
1 | |
其中参数p用于指定端口,默认端口是4000。
Hexo自带的服务器特点是能做到实时修改,即编辑好文章,保存文件之后,在浏览器刷新就可以查看保存后的效果。
不过Hexo自带的服务器性能不佳,只适合于本地调试,上线时请使用专业的服务器程序。
使用其它服务器程序时,如果你的服务器是Windows系统,可以在博客目录下使用以下脚本,生成html并自动同步到站点文件夹:
1 | |
使用其它服务器程序时具体如何配置,可以参考相关服务器的文档。
另外,在博客目录下使用以下脚本,可以生成网页文件,并使用winrar打包为zip文件,不过前提是需要将winrar添加进环境变量:
1 | |
参考文献
Hexo Fluid主题配置教程,详细到每一行代码_优岚岚的博客-CSDN博客_fluid hexo